Easy Rice Kheer Recipe at Home – Creamy Indian Dessert
Learn how to make creamy Indian rice kheer at home with milk, rice, sugar, cardamom and nuts. Follow this easy step-by-step kheer recipe.
 charchachowk
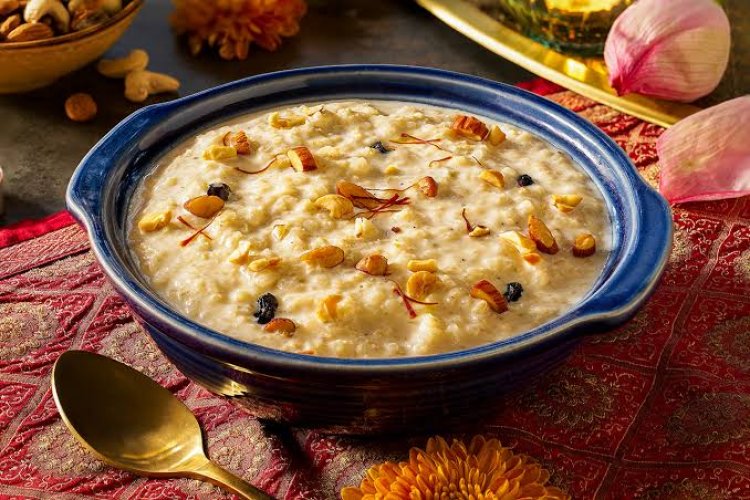

There is something special about a bowl of homemade kheer. The gentle aroma of milk simmering on the stove, the sweetness of sugar, and the rich flavour of cardamom can turn an ordinary day into a memorable occasion. In many Indian homes, kheer is more than just a dessert — it is a part of festivals, family celebrations, religious offerings, and childhood memories.
Traditional Indian rice kheer is made with just a few simple ingredients: rice, milk, sugar, cardamom, and nuts. The secret to getting that creamy, delicious texture is patience. When milk slowly thickens and the rice becomes soft, every spoonful feels comforting and satisfying.
If you want to make a classic Indian dessert at home without complicated ingredients or techniques, this easy kheer recipe is a wonderful place to start.
What Is Kheer?
Kheer is a traditional Indian dessert prepared by cooking rice in milk until it becomes soft and the mixture develops a rich, creamy consistency. It is usually sweetened with sugar and flavoured with cardamom, saffron, raisins, almonds, or cashews.
Kheer is commonly prepared during festivals such as Diwali, Raksha Bandhan, and Janmashtami, as well as for birthdays, family gatherings, and special occasions. Some families enjoy it warm, while others prefer it chilled after a few hours in the refrigerator.
Although there are many varieties of kheer, rice kheer remains one of the most loved because it is simple, affordable, and easy to prepare in a home kitchen.
Rice Kheer Recipe at a Glance
-
Preparation Time: 10 minutes
-
Cooking Time: 35–45 minutes
-
Total Time: Approximately 45–55 minutes
-
Servings: 4
-
Cuisine: Indian
-
Course: Dessert
-
Cooking Method: Stovetop
-
Difficulty Level: Easy
Ingredients for Homemade Rice Kheer
To prepare creamy and flavourful rice kheer, you will need the following ingredients:
-
1/4 cup raw rice, preferably basmati rice
-
1 litre full-fat milk
-
4–6 tablespoons sugar, adjusted to taste
-
1/2 teaspoon cardamom powder
-
8–10 almonds, chopped
-
8–10 cashews, chopped
-
1 tablespoon raisins
-
A few strands of saffron (optional)
-
1 teaspoon ghee (optional)
-
1–2 tablespoons chopped pistachios for garnish (optional)
Full-fat milk gives kheer a richer taste and creamier texture. You can adjust the amount of sugar and nuts according to your preference.
How to Make Kheer at Home: Step-by-Step Instructions
Step 1: Wash and Soak the Rice
Wash the rice two or three times under running water until the water becomes relatively clear. Soak it for around 15–20 minutes, then drain the water.
Soaking helps the rice cook more evenly and become soft without requiring excessive cooking time.
Step 2: Heat the Milk
Pour the milk into a heavy-bottomed pan and bring it to a gentle boil over medium heat. Stir occasionally to prevent the milk from sticking to the bottom.
Once the milk starts boiling, reduce the heat to low. A heavy-bottomed pan is especially useful because it distributes heat more evenly and reduces the chances of burning.
Step 3: Add the Rice
Add the drained rice to the simmering milk and stir well. Let the mixture cook on low to medium-low heat for approximately 30–40 minutes, stirring frequently.
As the rice cooks, it releases starch into the milk, helping the kheer become naturally thick and creamy. Gently mash a few rice grains against the side of the pan if you prefer a thicker texture.
Step 4: Add Sugar and Cardamom
When the rice becomes soft and the milk has thickened, add the sugar and cardamom powder. Stir until the sugar dissolves completely.
Add the saffron strands at this stage if you want a delicate aroma and a beautiful golden colour.
Step 5: Add the Nuts and Raisins
Add the chopped almonds, cashews, and raisins. You can lightly roast the nuts in a teaspoon of ghee before adding them for a deeper flavour, although this step is optional.
Allow the kheer to simmer for another 3–5 minutes so the flavours blend together.
Step 6: Adjust the Consistency
Check the consistency before turning off the heat. Kheer naturally thickens as it cools, so it is best to switch off the stove while it is still slightly thinner than your preferred final texture.
If it becomes too thick, add a little warm milk and stir gently.
Step 7: Garnish and Serve
Turn off the heat and garnish the kheer with chopped pistachios, almonds, or a few saffron strands.
Serve it warm for a comforting dessert, or allow it to cool and refrigerate it for a chilled, creamy treat.
Your homemade rice kheer is ready to enjoy!
Tips for Making Thick and Creamy Kheer
Making delicious kheer does not require professional cooking skills. A few simple tips can make a big difference.
1. Use full-fat milk: It gives the dessert a richer flavour and creamier consistency.
2. Cook on low heat: Slow cooking allows the rice to soften properly and the milk to thicken gradually.
3. Stir regularly: Milk can stick to the bottom of the pan, especially as it reduces. Stirring helps prevent scorching.
4. Do not add sugar too early: Add sugar after the rice has softened. This helps you manage the cooking process and achieve a better texture.
5. Choose the right rice: Basmati rice adds a pleasant aroma, but regular short- or medium-grain rice also works well.
6. Remember that kheer thickens as it cools: Avoid reducing it too much on the stove if you plan to serve it chilled.
7. Add flavourings according to taste: Cardamom is traditional, while saffron, rose water, or a small amount of edible camphor used appropriately can provide different flavour profiles. Keep additions modest so they do not overpower the dessert.
Common Mistakes to Avoid While Making Kheer
One of the most common mistakes is cooking the milk over high heat. This can cause the milk to scorch or boil over. Keep the heat moderate and stir regularly.
Another mistake is adding too much rice. A small amount of rice is enough to thicken a litre of milk, particularly when the kheer is given enough time to simmer.
Avoid adding sugar before the rice is properly cooked. Also, do not worry if the kheer looks slightly runny when hot; it will thicken further as it cools.
Finally, allow the dessert to cool safely before refrigeration. Do not leave milk-based kheer at room temperature for extended periods.
Delicious Variations of Kheer
Once you have mastered the basic recipe, you can experiment with different ingredients to suit your taste.
1. Makhana Kheer
Replace the rice with fox nuts, also known as makhana. Lightly roast the makhana, crush some of them, and simmer them in milk with sugar and cardamom.
2. Sabudana Kheer
Use soaked tapioca pearls instead of rice. Cook them in milk until they become translucent and soft. This version is especially popular during fasting periods, although fasting practices and permitted ingredients vary.
3. Vermicelli Kheer
Use roasted vermicelli instead of rice for a quicker dessert. It cooks faster and develops a lovely texture when simmered in milk.
4. Saffron Kheer
Add saffron strands soaked in a little warm milk for a fragrant dessert with a delicate colour.
5. Jaggery Kheer
For a traditional alternative to refined sugar, try jaggery. Cook the rice and milk completely first, then let the mixture cool slightly before adding dissolved and strained jaggery. Adding jaggery directly to very hot milk can sometimes cause curdling, depending on its composition.
Is Kheer Better Served Hot or Cold?
The answer depends on personal preference. Warm kheer has a soft, comforting texture and makes a lovely dessert on cool evenings. Chilled kheer becomes thicker and feels refreshing, particularly during warmer weather.
If you are serving kheer to guests, you can prepare it in advance, refrigerate it promptly, and garnish it just before serving.
How to Store Homemade Kheer
Allow the kheer to cool slightly, then transfer it to a clean, covered container and refrigerate it promptly. For food safety, do not leave it at room temperature for more than two hours, or one hour when the temperature is above 32°C.
Refrigerated kheer is best enjoyed within 2–3 days. Always use a clean spoon when serving and discard it if it develops an unusual smell, appearance, or texture.
Kheer may become thicker in the refrigerator. Stir in a little cold or warm milk, as appropriate, before serving if you prefer a looser consistency.